System settings
Menu item System settings is designed to set up and add event rules, projects, roles and users and their accounts to the System. It also allows to configure, add and delete road sections.
Projects
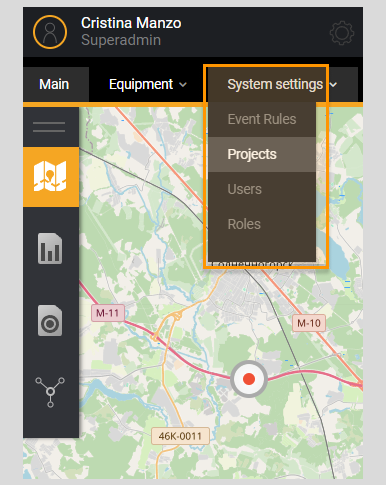 //ФОТО
In the Projects section the user can see a filter to search for the necessary information and a list of added to the System projects .
In the table below you can find the Project filter parameters.
| Parameter | Description |
|---|---|
| Project name | Field for entering the project name |
| Vehicle class group | Drop-down list of the registered vehicle classes groups associated with the projects |
Project list parameters
| Parameter | Description |
|---|---|
| # | Sequence number of the entry in the list |
| Project | Project name specified when adding |
| Organization | Organization to which the project belongs |
| Object class group | Vehicle classes group related to a certain project |
| Detectors | Number of detectors related to the project |
| Users | Number of users of a certain organization |
| Active | The project activity status in the System, which depends on the start and end date of the project when it is added. The orange indicator is a sign of an active project. A gray indicator indicates an inactive project |
| Change date | Date when the project information was last edited |
The project list can be sorted by project name, organization name, vehicle classes group, amount of detectors , user amount, status in the project and by date of the last project editing.
Adding new projects
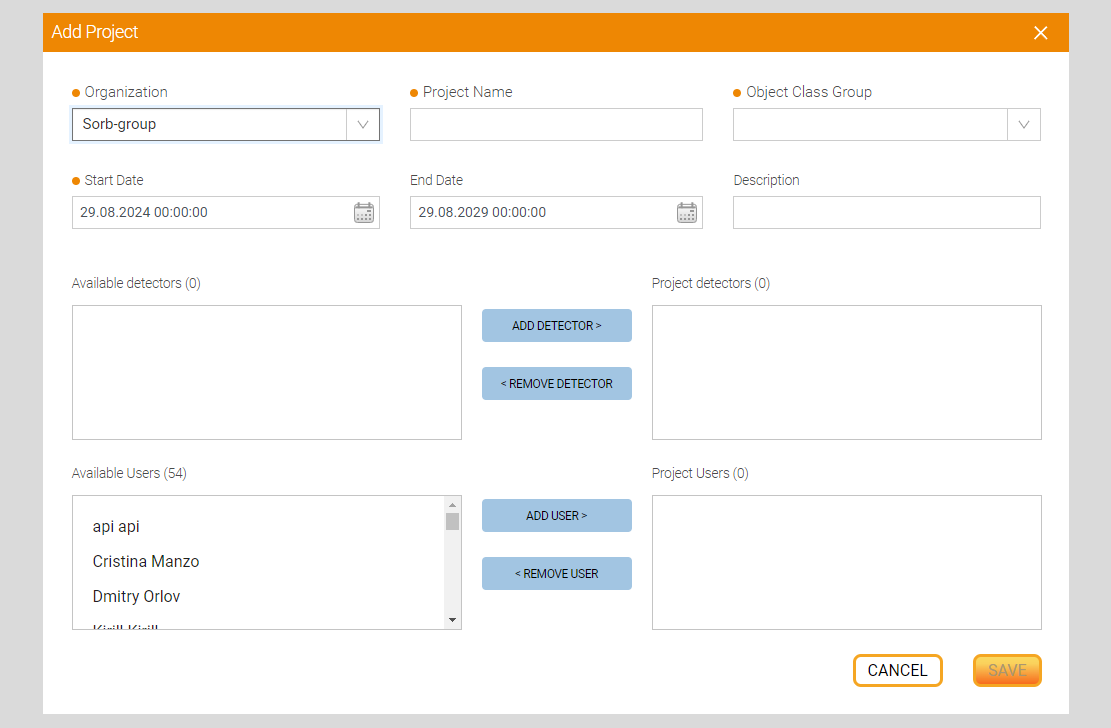
New projects are added to the System by clicking on the Add project button . The user will see a window for entering parameters.
 //ЗАМЕНА ФОТО
In the table below are described parameters for adding a project.
| Parameter | Description |
|---|---|
| Project name* | A unique name of the added project should be entered in the field. (a mandatory field) |
| Object class group* | In the field, the user selects a group of vehicle classes used to classify vehicles registered by detectors (a group of classes must be added to the System). |
| Start date* | The start date of the project in the System |
| End date | The end date of the project |
| Description | Project description |
| Available detectors | In the field the user can see detectors available for adding to the project (detectors must be added to the system). Detectors are added to the project by selecting a detector in the window and clicking the Add detector button |
| Project detectors | In the field the user can see detectors added to the project. Detectors are removed from the project by selecting a detector in the window and pressing the button Remove detector. |
| Available users | A field for selecting users, already registered in the System by the "Sorb Engineering" technical support specialist to add them to the project for further work with it. Users are added to the project by selecting the required user in the window and clicking the Add user button ` |
| Project users | The field displays the users added to the project. Users are removed from a project by selecting the user in the window and clicking theRemove user button |
| Save | A button that saves the entered parameters and creates a new project |
| Cancel | A button that resets the entered parameters and cancels the creation of a new project |
(*) - It is a mandatory field
Editing and deleting a project
You should hover the mouse cursor over an entry in the list and click on the edit button to change project parameters (//ДОБАВИТЬ ФОТО). When you click this button, there will open an editing window (similar to the adding window) with the previously specified parameters. An editing window differs from the adding window by an opportunity to copy project ID.
//ДОБАВИТЬ ФОТО
In order to remove a project from the System click on the Delete(//ДОБАВИТЬ ФОТО). When you click this button, you must confirm the deletion in a pop-up window or cancel the deletion by clicking the DON'T DELETE button.
Users
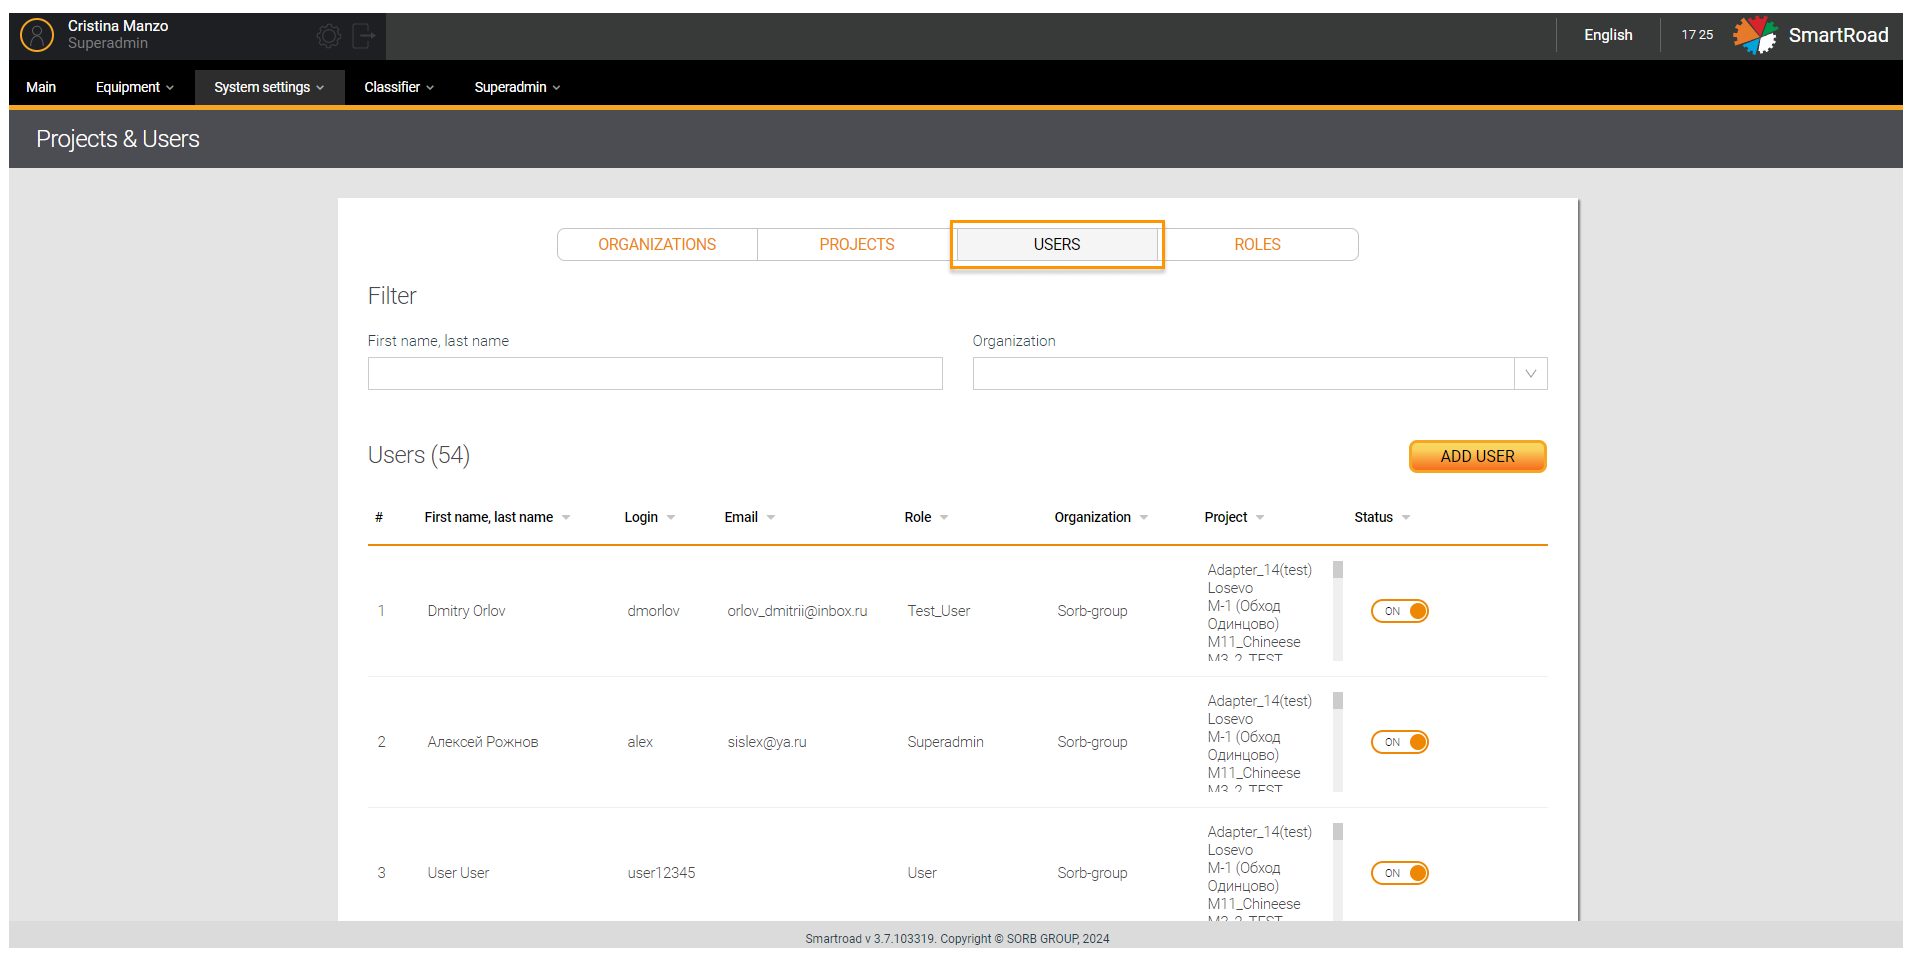
The Users page contains a filter to select the necessary information and a list of users added to the System.
 //ЗАМЕНА ФОТО
In the following table the User filter parameters are listed.
| Parameter | Description |
|---|---|
| First Name Last Name | A Field for entering the user's first name and last name |
User list parameters
| Parameter | Description |
|---|---|
| # | Sequence number of a user in the user list |
| First Name, Last Name | User's first and last name specified during the registration in the System |
| Login | User login to log into the System |
| User email specified during the registration in the System | |
| Role | User role |
| Project | Projects available for viewing/editing by the user (related to the user account) |
| Status | The activity status of the user account in the System. In the on state, the indicator is orange (a sign of an active account). The off indicator is a sign of an inactive account |
In the off state, the user will not be able to log into the System
The Users list allows you to sort the list by first name, by last name, by login, by user email, name of organization, by project name and by status in the project.
Adding new users
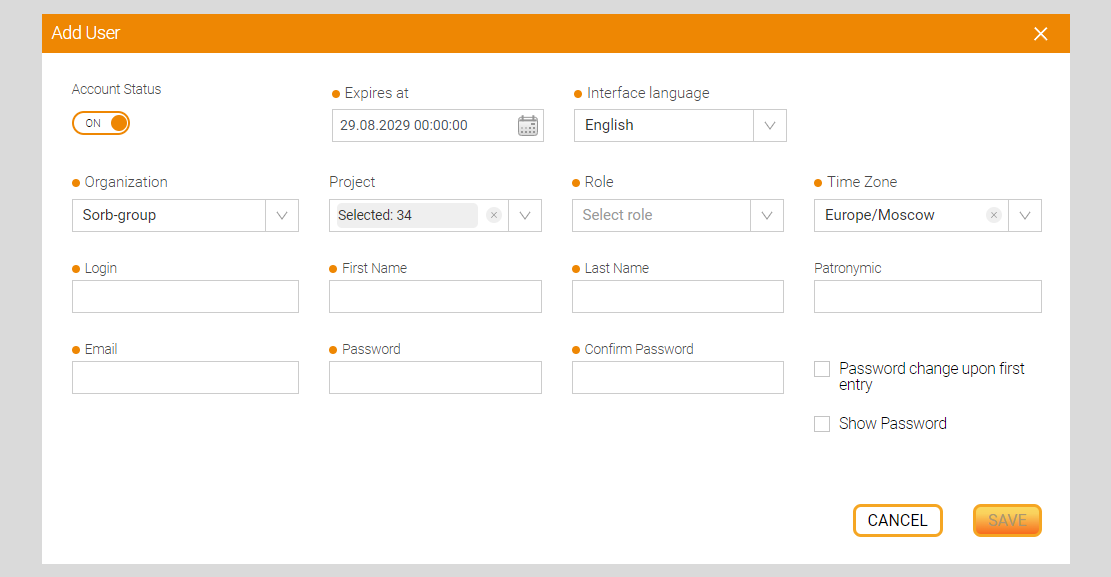
To add a new user, clicking the Add user button . The user will see a window for entering parameters.
 //ЗАМЕНА ФОТО
In the following table the User addition parameters are described.
| Field name | Field description |
|---|---|
| Account status | A toggle that determines the action of the user account in the System. When the off status is enabled, the user is inactive |
| Expires at* | A field to enter the expiration date for the user account in the calendar |
| Interface language* | A drop-down list of available languages for the user interface |
| Project | A drop-down list of available projects related to the user account. Selection is made by setting a checkbox |
| Role* | A field to select a role for the user account from the drop-down list |
| Time Zone* | A field to select a time zone for the user account from the drop-down list |
| Login* | A field for the user account login |
| First name* | User name |
| Last name* | User surname |
| Patronymic | User patronymic |
| Email* | User email |
| Password* | A field for the user password to log into the System |
| Confirm password* | A field for the user to repeat the password to log into the System |
| Password change upon first entry | A checkbox that allows to change the password when logging into the System for the first time |
| Show password | A checkbox that, when activated, displays the specified password |
| Save | A button that saves the entered parameters and creates a new user in the System |
| Cancel | A button that resets the entered parameters and cancels the creation of a new user in the System |
(*) - Mandatory field
Editing and deleting a user
You should hover the mouse cursor over an entry in the list and click on the edit button to change user parameters (//ДОБАВИТЬ ФОТО). When you click the button, there will open an editing window (similar to the adding window) with the previously specified parameters.
In order to remove a user from the System, click on the Delete button (//ДОБАВИТЬ ФОТО). When you click the button, you must confirm the deletion in a pop-up window or cancel the deletion by clicking the DON'T DELETE button .
Roles
 //ЗАМЕНА ФОТО
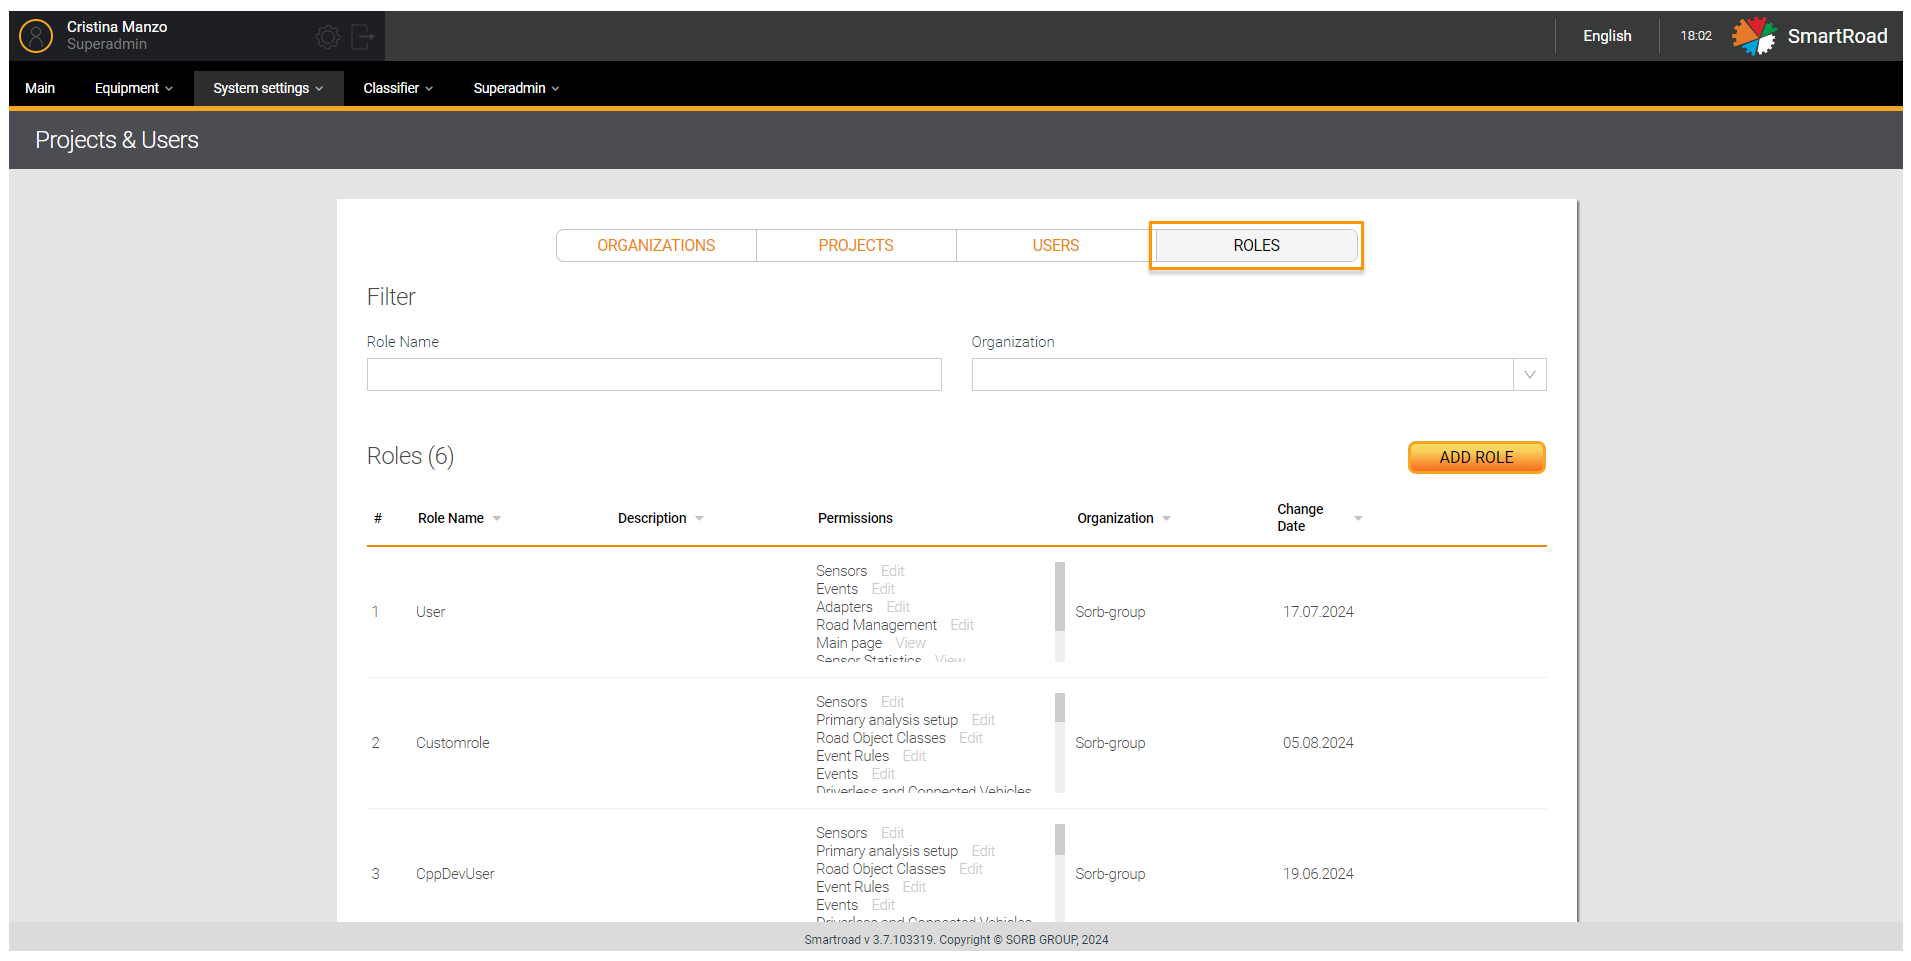
In the System there is a flexible customization of roles according to the user needs. Access rights in the System are distinguished by editing permissions in the Roles section.
The Roles page contains a filter to select the necessary information and a list of roles added to the System.
In the table below the Role filter parameters are described.
| Parameter | Description |
|---|---|
| Role name | Field to enter the user role name |
Role list parameters
| Parameter | Description |
|---|---|
| # | Sequence number of a role in the role list |
| Role name | Role name specified when added |
| Description | Role description specified when added |
| Permissions | A Set of rights (Change or View) for a given role |
| Date changes | Date when the role information was last edited |
Adding new roles
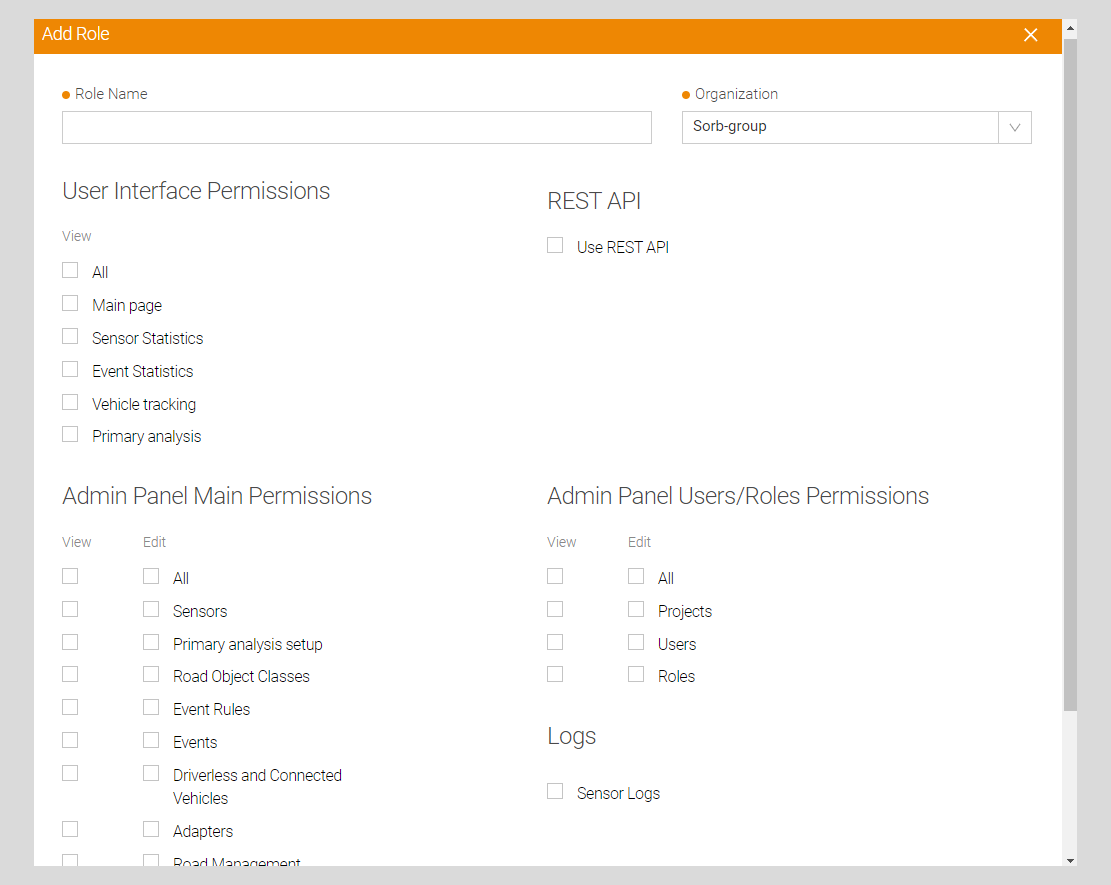
To add a new role click the Add role button. When the button is pressed, a window for entering parameters is displayed.
 //замена фото
Parameters for adding a role
| Field/checkbox name | Field description |
|---|---|
| Role name* | A field to enter the role name in the System |
The User Interface Permissions
| Field/checkbox name | Permission description |
|---|---|
| - All - Home page - Detector statistics - Event statistics - Vehicle tracking - Primary analysis | Checkboxes that, when activated, determine the rights to view sections in the UI |
| - All - Detectors - Setting up primary analysis - Vehicle classes - Events - Event Rules - Unmanned and connected vehicles - Adapters - Road management | Checkboxes that, when activated, determine the rights to view and change sections in the UI |
REST API
| Field/checkbox name | Field description |
|---|---|
| Use REST API | A checkbox that, when activated, determines the rights to use the REST API |
Permissions for Projects, Users, and Roles Interface
| Field/checkbox name | Permission description |
|---|---|
| - All - Projects - Users - Roles | Checkboxes that, when activated, determine the rights to view and change sections of the web interface |
Logs
| Field/checkbox name | Description |
|---|---|
| Detector logs | A checkbox that, when activated, determines the rights to view detector logs |
| Save | A button that saves the entered parameters and creates a new role in the System |
| Cancel | A button that resets the entered parameters and cancels the creation of a new role in the System |
(*) - Mandatory field
Editing and deleting a role
You should hover the mouse cursor over an entry in the list and click on the Edit button (//ФОТО) to change the parameters of a role. When you click the button,there will open an editing window (similar to the adding window) with the previously specified parameters.
In order to remove a role from the System, click on theDelete button (//ФОТО). When you click the button, you must confirm the deletion in a pop-up window or cancel the deletion by clicking the DON'T DELETE button .
Road sections
The page "Road sections settings" is designed to create, edit and delete road sections. При выбое пункта меню "Участки дороги" осуществляется переход на страницу участков дорог, выделенных из общей протяженности определенной автомобильной дороги. На странице расположены фильтр и список всех существующих в Системе участков дорог.
In the filter the user can enter parameters to select road sections by their registry number and by the number of lanes.
//ФОТО
Filter parameters on the page "Road sections settings"
| Field name | Description |
|---|---|
| Registry number | Registry number, entered in the menu item Classifier when adding an automobile road. For example, М-4. By default, information in the table is sorted in the ascending order by the column value Registry number. |
| Section name | Section name in the System. Defined by the user |
| Number of lanes | Number of lanes on the road section of the road, on which the detector is installed р |
Road section list parameters
| Field name | Description |
|---|---|
| # | Sequence number of a road section in the road section list |
| Registry number | Registry number, entered in the menu item Classifier when adding an automobile road. For example, М-4. By default, information in the table is sorted in the ascending order by the column value Registry number. |
| Section name | Section name in the System. Defined by the user |
| Start (km,m) | Picket of the beginning of a road section (km+m) |
| End (km,m) | Picket of the end of a road section (km+m) |
| Total length,km | Road length value, calculated in the following way: in forward direction - the beginning is subtracted from the end, in backward direction - otherwise. If length section is negative, the user may have entered incorrect values of the beginning and the end of the road section (picket) |
| Number of lanes from km 0/to km 0 | Number of lanes on the road section of the road, on which the detector is installed |
| Number of detectors | Number of detectors, installed on the certain road section |
Adding a new road section
A new road section is added to the System by clicking theAdd road section button on page Road section settings. After the saving of the created and edited road section the user is switched to the road section list.
//ФОТО
Parameters for adding a road section
| Field name | Description |
|---|---|
| Registry number* | Registry number, entered in the menu item Classifier when adding an automobile road. For example, М-4. By default, information in the table is sorted in the ascending order by the column value Registry number. |
| Start of section* | Picket of the beginning of a road section (km+m) |
| End of section* | Picket of the end of a road section (km+m) |
| Section length | Road length value, calculated in the following way: in forward direction - the beginning is subtracted from the end, in backward direction - otherwise. If length section is negative, the user may have entered incorrect values of the beginning and the end of the road section (picket) |
| Name* | Section name in the System. Defined by the user |
| Two directions/one direction | A toggle which allows to select one or two directions for a road section (to 0 km/from 0 km). By default a road section is bidirectional. |
| From km 0/ to km 0* | Direction name in the System. Can be set up by the user |
| Number of lanes | Number of lanes by direction |
| Capacity P, veh/hr | A field to enter the maximum calculated capacity of a road section. By default the toggle (//ФОТО) is disabled. If the user enables it, it will be possible to input values for each lane separately |
| Max Density Qmax, veh/km | A field to enter the maximum calculated traffic density on a road section. By default the toggle (//ФОТО) is disabled. If the user enables it, it will be possible to input values for each lane separately |
| Detectors in section | A list of detectors, installed within a selected section. It is presented as a list of toggles. |
| Cancel | A button that resets the entered parameters and cancels the creation of a new road section |
| Save | A button that saves the entered parameters and creates a new road section |
(*) - Mandatory field
Editing and deleting a road section
You should hover the mouse cursor over an entry in the list and click on the edit button to change the road section parameters (//ФОТО). When you click the button,the user will switch to the Edit Road section page (similar to the adding window) with the previously defined parameters.
In order to remove a user from the System, click on the “Delete" button (//ФОТО). When you click the button, you should confirm the deletion in the pop-up window by clicking the DELETE button or cancel the deletion by clickimg the DON'T DELETE button.
//ФОТО