Настройки системы
Пункт меню Настройки системы предназначен для настройки и добавления проектов, ролей и пользователей, их учетных записей в Систему, а также позволяет выполнять настройку, создание и удаление участков дорог.
Проекты
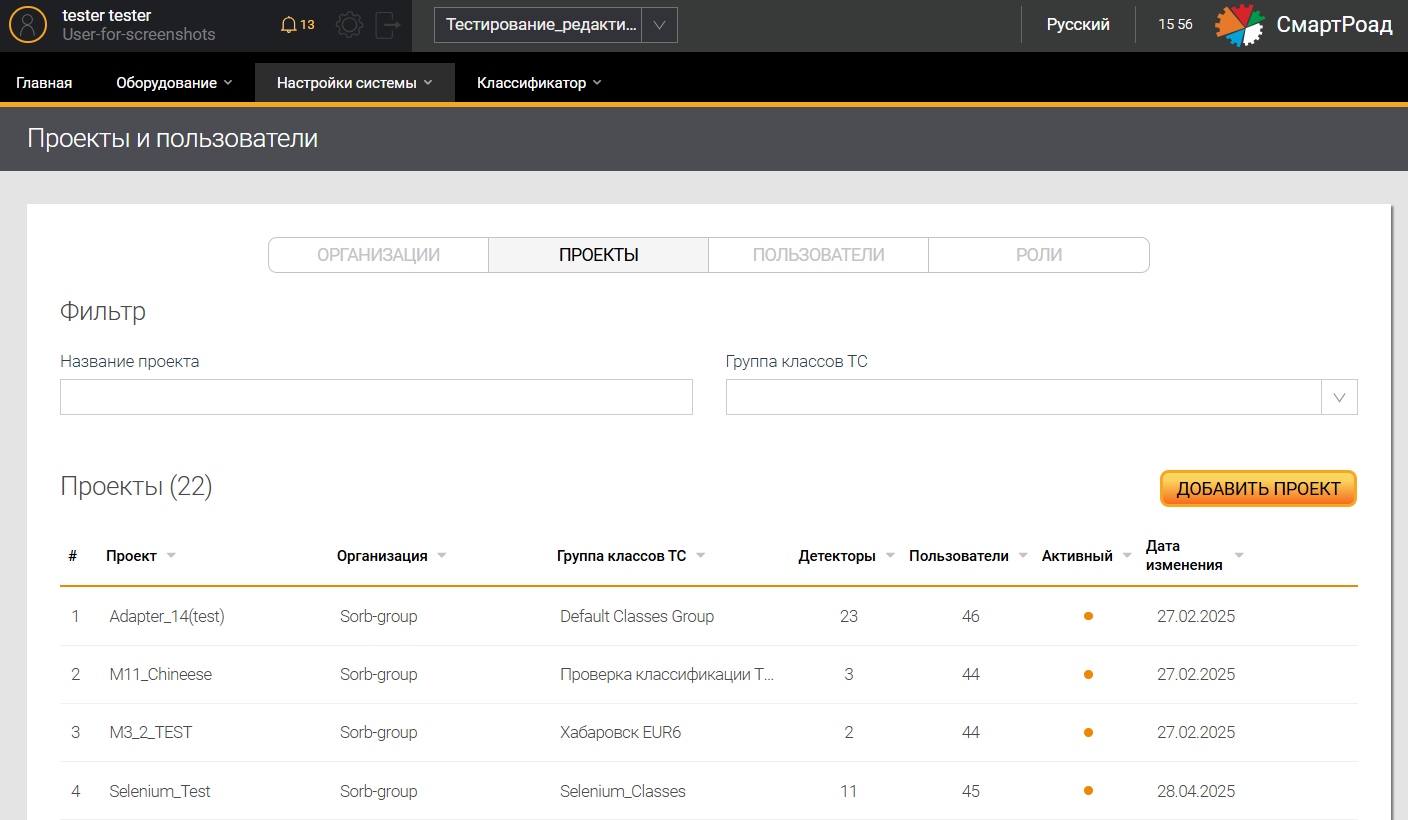
На странице Проекты пользователю доступен фильтр по названию проекта и по названию привязанной к проекту группы классов ТС для поиска необходимой информации и список добавленных в Систему проектов.
Параметры списка проектов
| Параметр | Описание |
|---|---|
| Проект | Название проекта, заданное при добавлении |
| Организация | Организация, к которой относится проект |
| Группа классов ТС | Группа классов ТС, которая привязана к определенному проекту |
| Детекторы | Количество детекторов, относящихся к проекту |
| Пользователи | Количество пользователей, относящихся к организации |
| Активный | Статус активности проекта в Системе, который зависит от даты начала и окончания проекта при его добавлении. Оранжевый индикатор является признаком активного проекта, серый - неактивного. |
| Дата изменения | Дата последнего редактирования информации о проекте |
Список проектов позволяет сделать сортировку по названию проекта, названию организации, по группе классов ТС, количеству детекторов, количеству пользователей, по статусу в проекте и дате последнего изменения проекта.
Добавление новых проектов
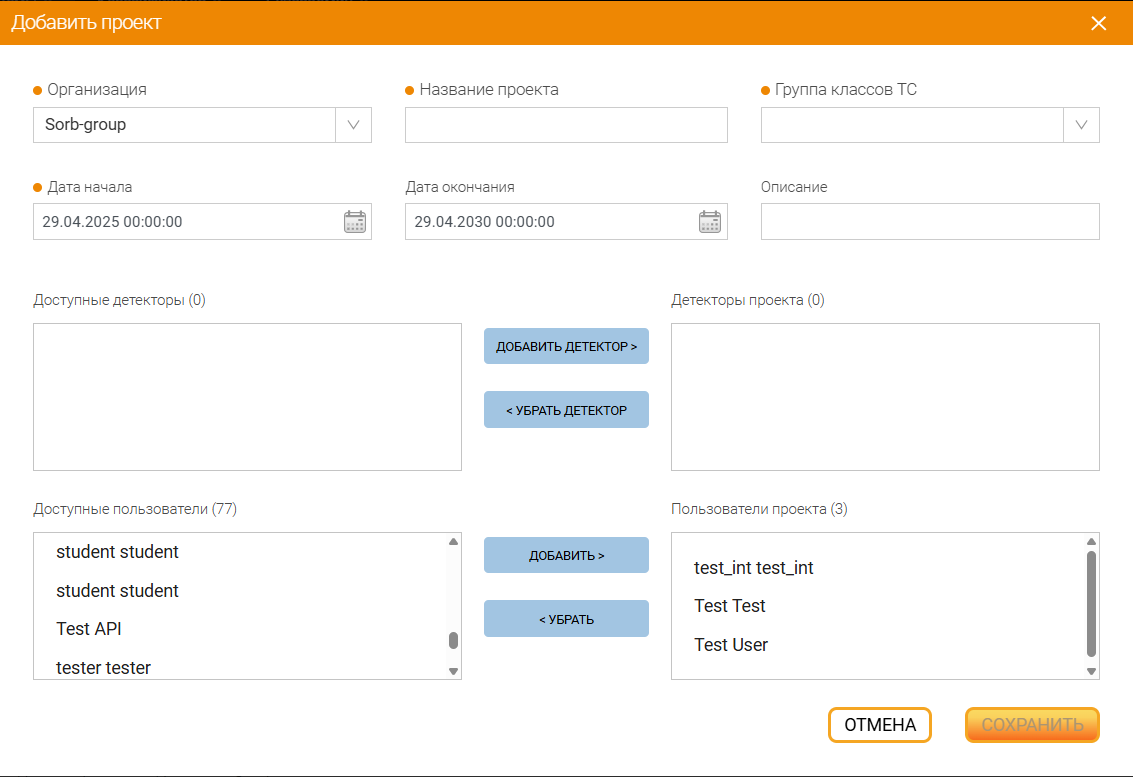
Добавление новых проектов производится кликом на кнопку Добавить проект. Пользователю отображается окно ввода параметров.
Параметры добавления проекта
| Наименование поля | Описание поля |
|---|---|
| Название проекта1 | В поле вводится уникальное наименование добавляемого проекта. Обязательное для заполнения поле |
| Группа классов ТС1 | В поле выбирается группа классов ТС (группа классов должна быть добавлена в Систему), используемая для классификации регистрируемых детекторами ТС. |
| Дата начала1 | В поле вводится дата начала действия проекта в Системе |
| Дата окончания | В поле вводится дата окончания проекта |
| Описание | В поле вводится описание проекта |
| Доступные детекторы | В поле отображаются доступные для добавления в проект детекторы (детекторы должны быть добавлены в Систему). Добавление детекторов в проект осуществляется посредством выбора детектора в окне и нажатия кнопки Добавить детектор |
| Детекторы проекта | В поле отображаются добавленные в проект детекторы. Удаление детекторов из проекта осуществляется посредством выбора детектора в окне и нажатия кнопки Убрать детектор |
| Доступные пользователи | Поле выбора пользователей, уже зарегистрированных в Системе специалистом технической поддержки ООО "Сорб Инжиниринг", для добавления их в проект для дальнейшей работы с ним. Добавление пользователей в проект осуществляется посредством выбора соответствующего пользователя в окне и нажатия кнопки Добавить. |
| Пользователи проекта | В поле отображаются добавленные в проект пользователи. Удаление пользователя из проекта осуществляется посредством выбора пользователя в окне и нажатия кнопки Убрать |
Пользователи
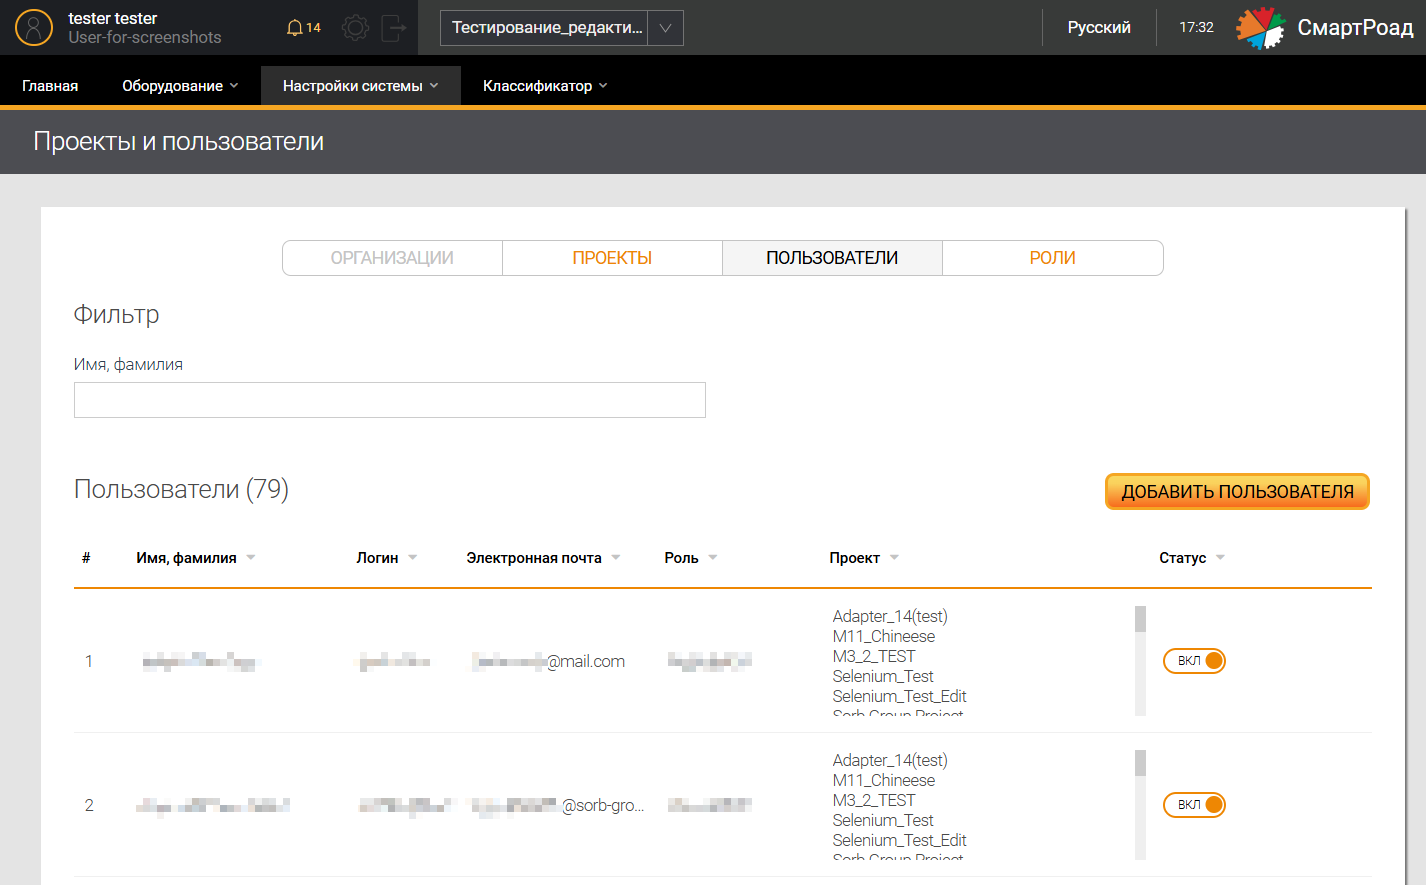
На странице Пользователи пользователю доступен фильтр для поиска необходимой информации и список добавленных в Систему пользователей.
Параметры списка пользователей
| Параметр | Описание |
|---|---|
| Имя, фамилия | Имя и фамилия пользователя, заданные при регистрации в Системе |
| Логин | Логин пользователя, который используется для входа в Систему |
| Электронная почта | Электронная почта пользователя, заданная при регистрации в Системе |
| Роль | Роль пользователя |
| Проект | Проекты, доступные пользователю для просмотра/редактирования (к которому относится учетная запись пользователя) |
| Статус | Статус активности учетной записи пользователя в Системе. В состоянии ВКЛ оранжевый индикатор - признак активной учетной записи. Индикатор «ВЫКЛ» является признаком неактивной учетной записи. |
В состоянии ВЫКЛ пользователь не сможет войти в Систему.
Список пользователей позволяет сделать сортировку по имени, фамилии пользователя, логину, по электронной почте, роли, названию организации, по названию проекта и по статусу в проекте.
Добавление новых пользователей
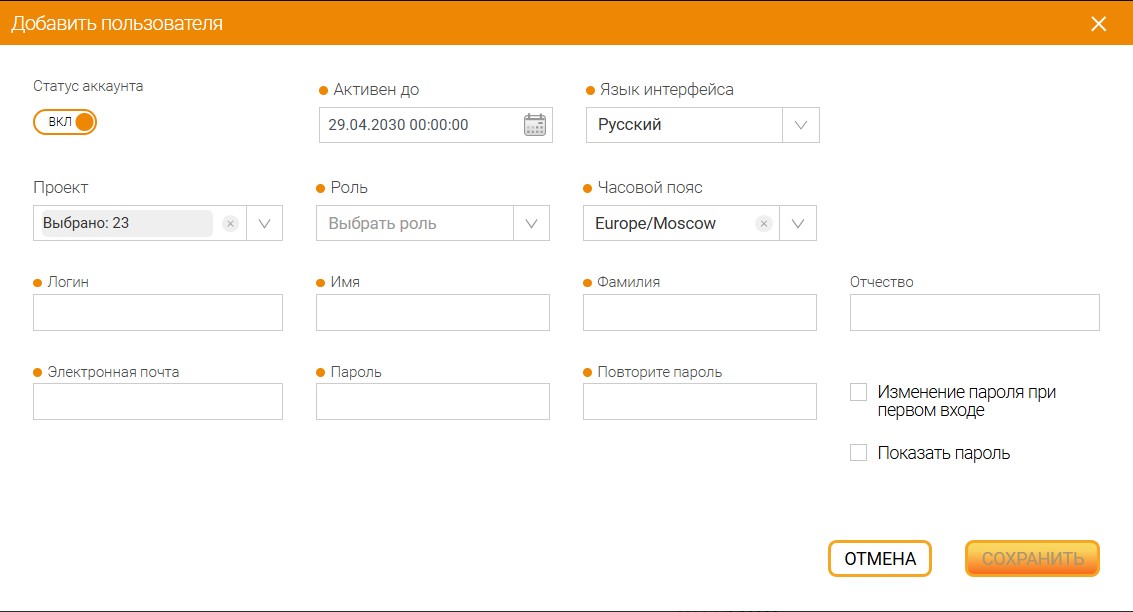
Добавление новых пользователей производится кликом на кнопку Добавить пользователя. Пользователю отображается окно ввода параметров.
Параметры добавления пользователя
| Наименование поля | Описание поля |
|---|---|
| Статус аккаунта | Переключатель, определяющий действие учетной записи пользователя в Системе. При включённом статусе ВЫКЛ пользователь неактивен. |
| Активен до1 | В календаре вводится дата окончания действия учетной записи пользователя |
| Язык интерфейса1 | Список доступных языков для интерфейса пользователя |
| Проекты | Список доступных проектов, к которым относится учетная запись пользователя. Выбор осуществляется установкой чек-бокса. |
| Роль1 | Выбор роли для учетной записи пользователя |
| Часовой пояс1 | Выбор часового пояса для учетной записи пользователя |
| Логин1 | Логин учетной записи пользователя |
| Имя1 | Имя пользователя, отображаемое в Системе |
| Фамилия1 | Фамилия пользователя, отображаемое в Системе |
| Отчество | Отчество пользователя, отображаемое в Системе |
| Электронная почта1 | Электронная почта пользователя |
| Пароль1 | Пароль для входа пользователя в Систему |
| Повторите пароль1 | Повторный ввод пароля |
| Изменение пароля при первом входе | Чек-бокс, при активации которого пользователю будет предложено изменить пароль (при первом входе в Систему) |
| Показать пароль | Чек-бокс, при активации которого отображается указанный пароль |
Роли
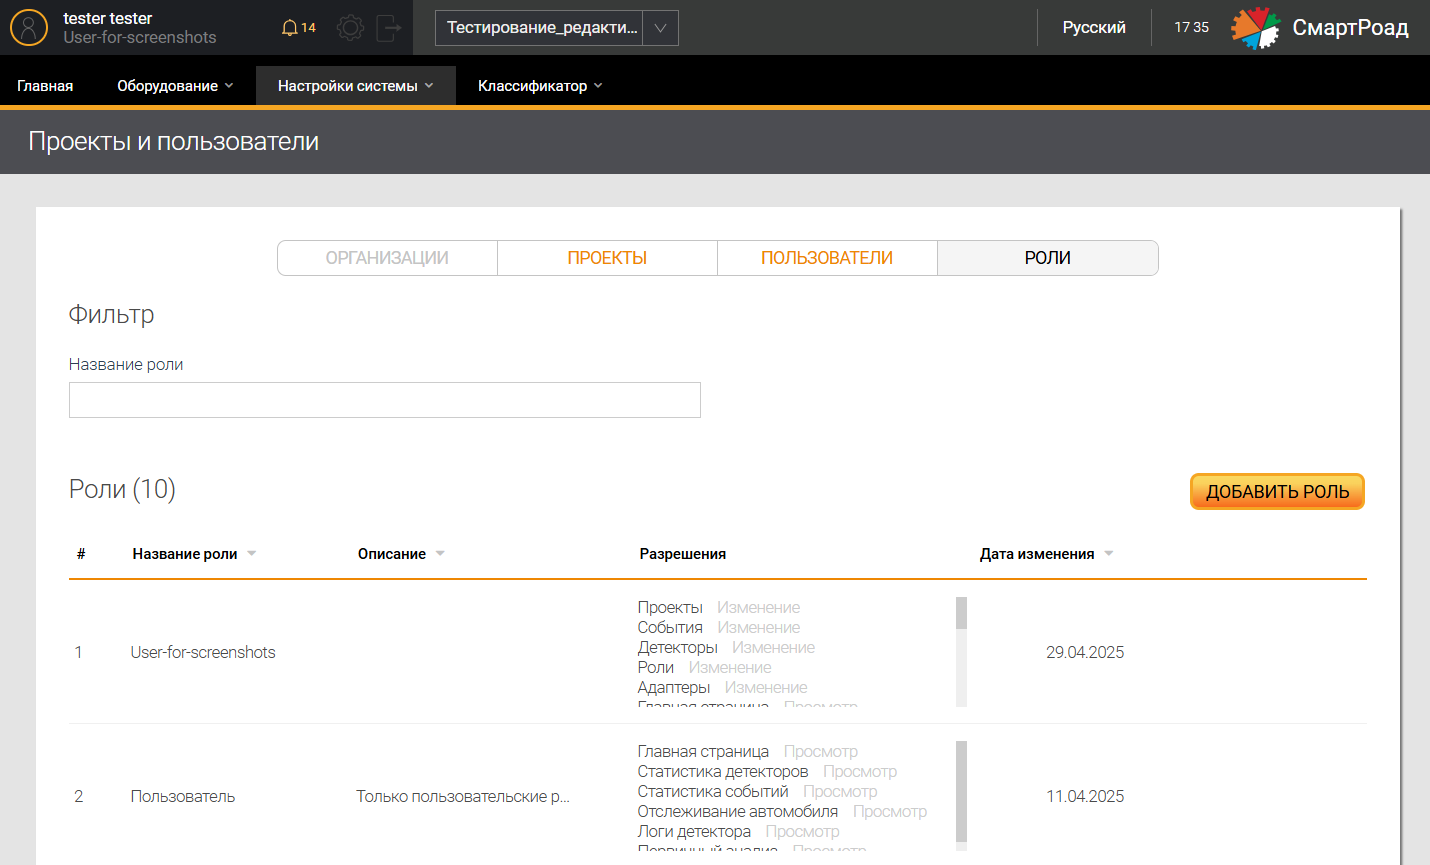
В Системе существует гибкая настойка ролей пользователей в зависимости от потребностей. Разграничение прав доступа в Системе производится путем редактирования разрешений в разделе Роли.
На странице Роли пользователю доступен фильтр по названию роли пользователя для поиска необходимой информации и список добавленных в Систему ролей.
Параметры списка ролей
| Параметр | Описание |
|---|---|
| Название роли | Название роли, заданное при добавлении |
| Описание | Описание роли, заданное при добавлении |
| Разрешения | Набор прав (Изменение или Просмотр) доступа для данной роли |
| Дата изменения | Дата последнего редактирования информации о роли |
Добавление новых ролей
Добавление новых ролей производится кликом на кнопки Добавить роль. При нажатии кнопки пользователю отображается окно ввода параметров.
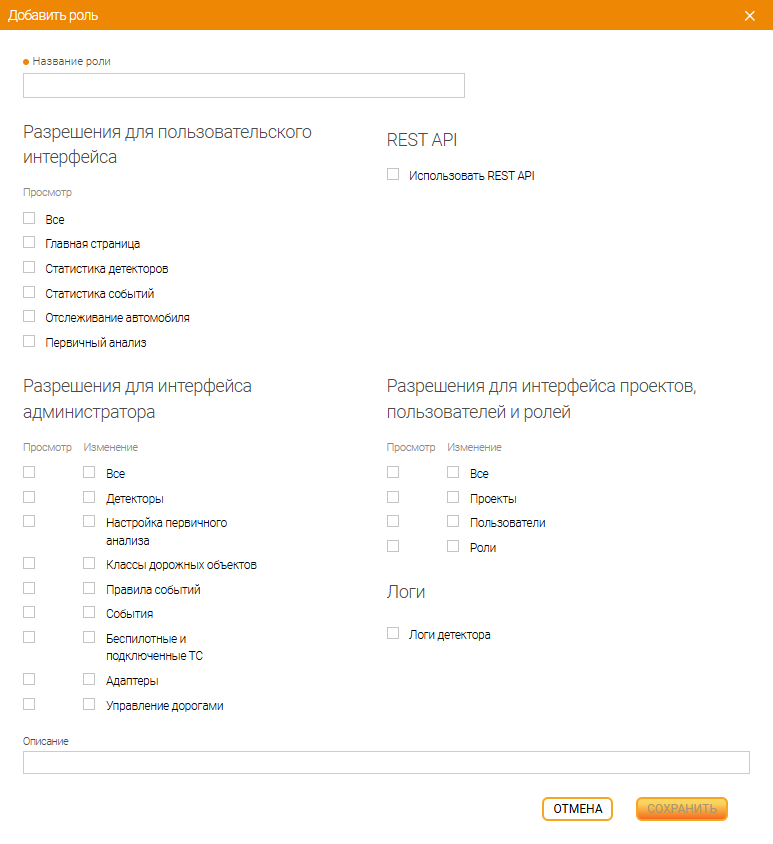
В окне добавления роли необходимо ввести ее название в соответствующее текстовое поле. Этот параметр является обязательным. При выборе чек-боксов столбца просмотр роли выдаются права на просмотр выбранных разделов веб-интерфейса. При выборе чек-боксов столбца изменение роли выдаются права на просмотр и редактирование выбранных разделов. Если ни один из чек-боксов для раздела не выбран, то у данной роли не будет доступа к такому разделу. Чек-бокс Использовать REST API активирует право пользователя использовать REST API, чек-бокс Логи - право на доступ к логам детекторов. В строку Описание можно добавить описание роли или комментарий к ней.
Участки дорог
Страница Настройка участков дорог предназначена для создания, редактирования и удаления участков дорог. При выборе пункта меню Участки дороги осуществляется переход на страницу участков дорог, выделенных из общей протяженности определенной автомобильной дороги. На странице расположены фильтр и список всех существующих в Системе участков дорог.
В фильтре задаются параметры для отбора участков дорог по учетному номеру дороги и количеству полос.
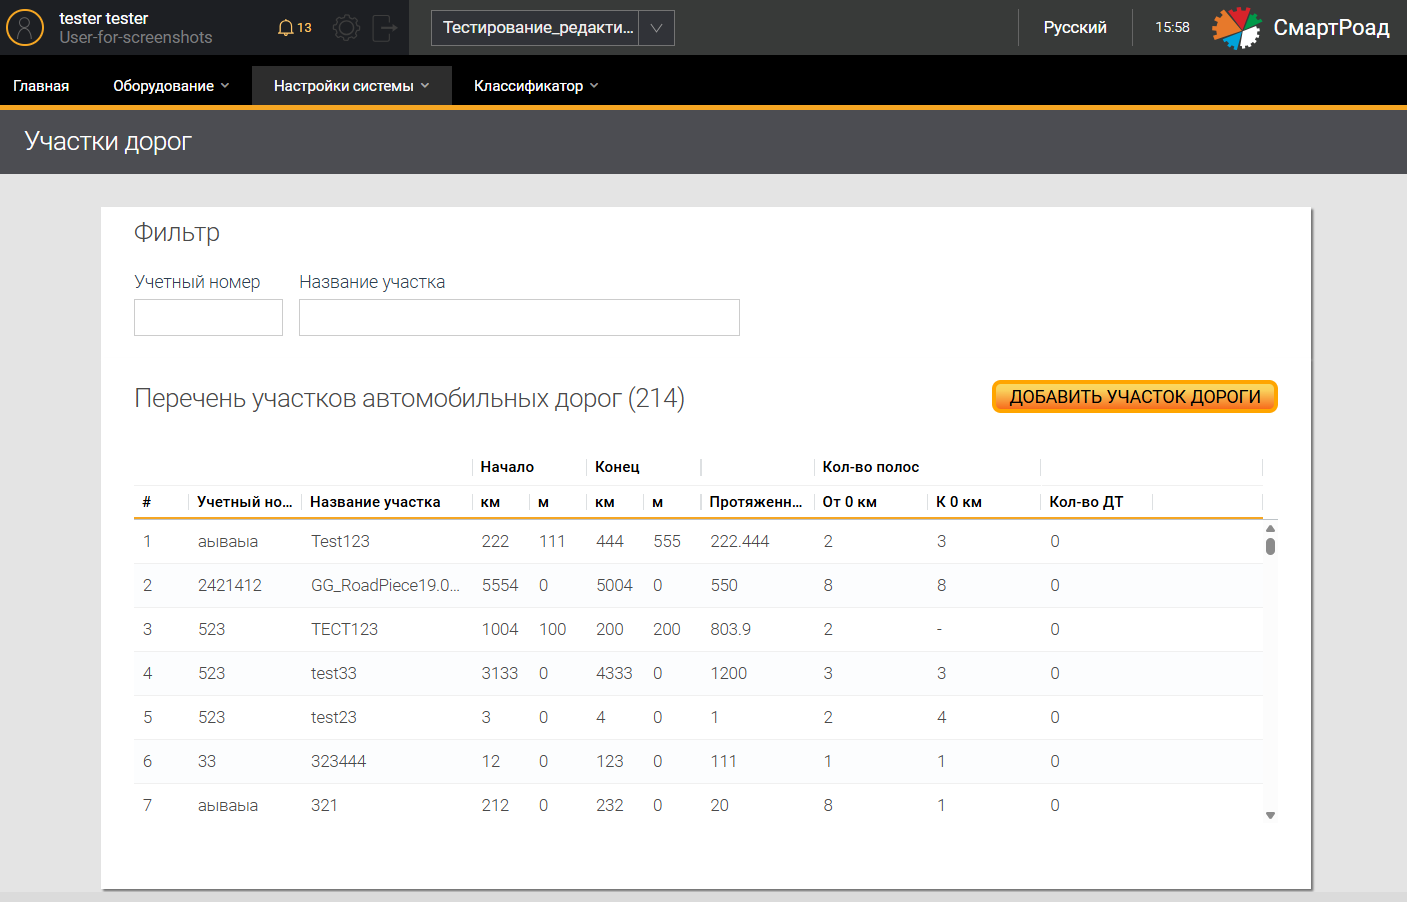
Параметры фильтра на странице Настройка участков дорог
| Наименование поля | Описание |
|---|---|
| Учетный номер дороги | Учетный номер, заданный в пункте меню Классификатор при добавлении автомобильной дороги. Например, М-4. По умолчанию информация в таблице сортируется по возрастанию значения колонки Учетный номер. |
| Название участка | Название, присвоенное данному участку дороги. Задается пользователем |
| Количество полос | Количество полос на участке дороги, на которой установлен детектор |
Параметры списка участков дорог
| Наименование поля | Описание |
|---|---|
| Учетный номер дороги | Учетный номер, заданный в пункте меню Классификатор при добавлении автомобильной дороги. Например, М-4. По умолчанию информация в таблице сортируется по возрастанию значения колонки Учетный номер. |
| Название участка | Название, присвоенное данному участку дороги. Задается пользователем |
| Пикетаж начала | Пикетаж начала участка дороги |
| Пикетаж конца | Пикетаж конца участка дороги |
| Протяженность | Значение протяженности дороги, вычисленное следующим образом: в прямом направлении - из конца вычитается начало, в обратном - из начала вычитается конец. Если протяженность дороги получилась отрицательной, пользователь ввел некорректные значения начала и конца участка дороги (пикетаж). |
| Количество полос к 0 км/от 0 км | Количество полос на участке дороги, на которой установлен детектор |
| Кол-во ДТ | Количество детекторов, размещенных на данном участке дороги |
Добавление участка дороги
Добавление нового участка дороги в Систему осуществляется кликом на кнопку Добавить участок дороги на странице Настройка участков дорог. После сохранения созданного и отредактированного участка осуществляется переход на список участков дорог.
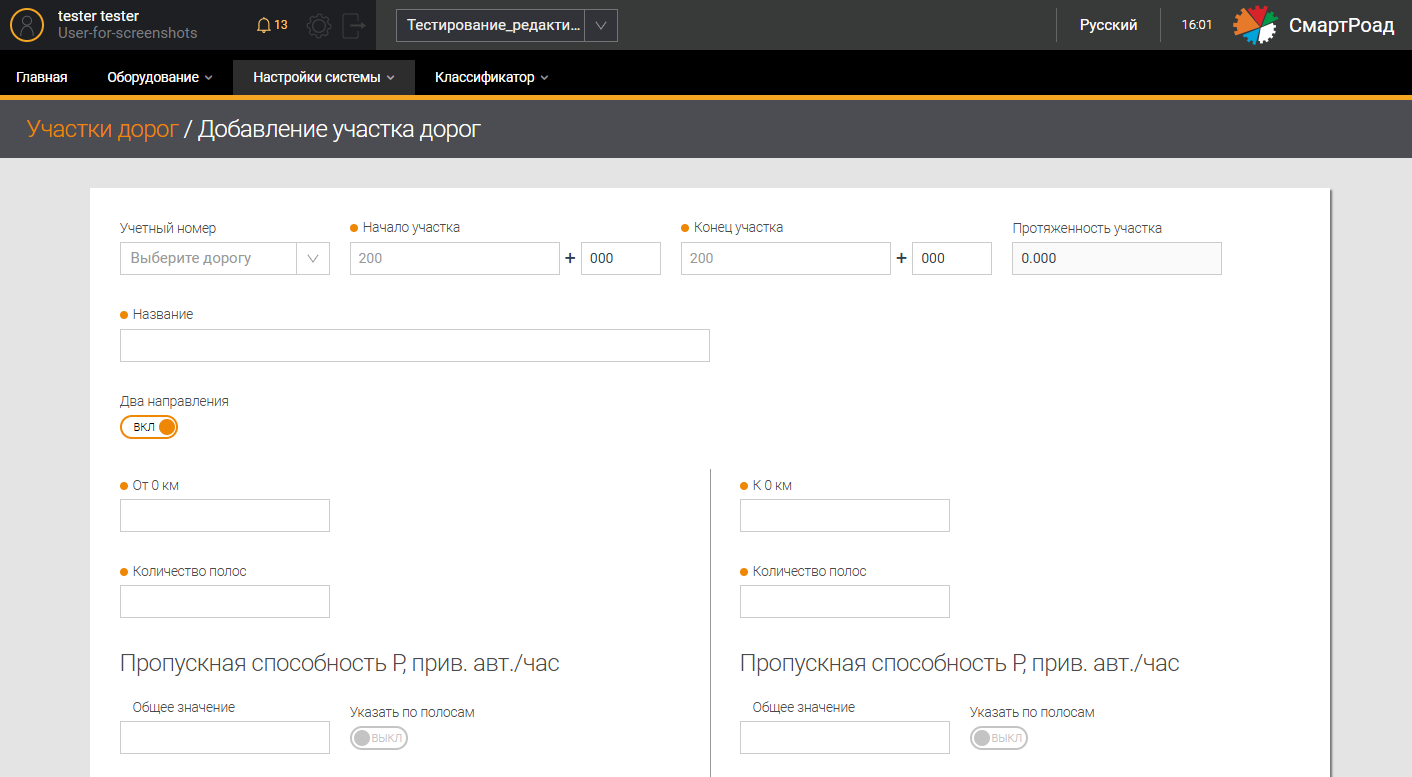
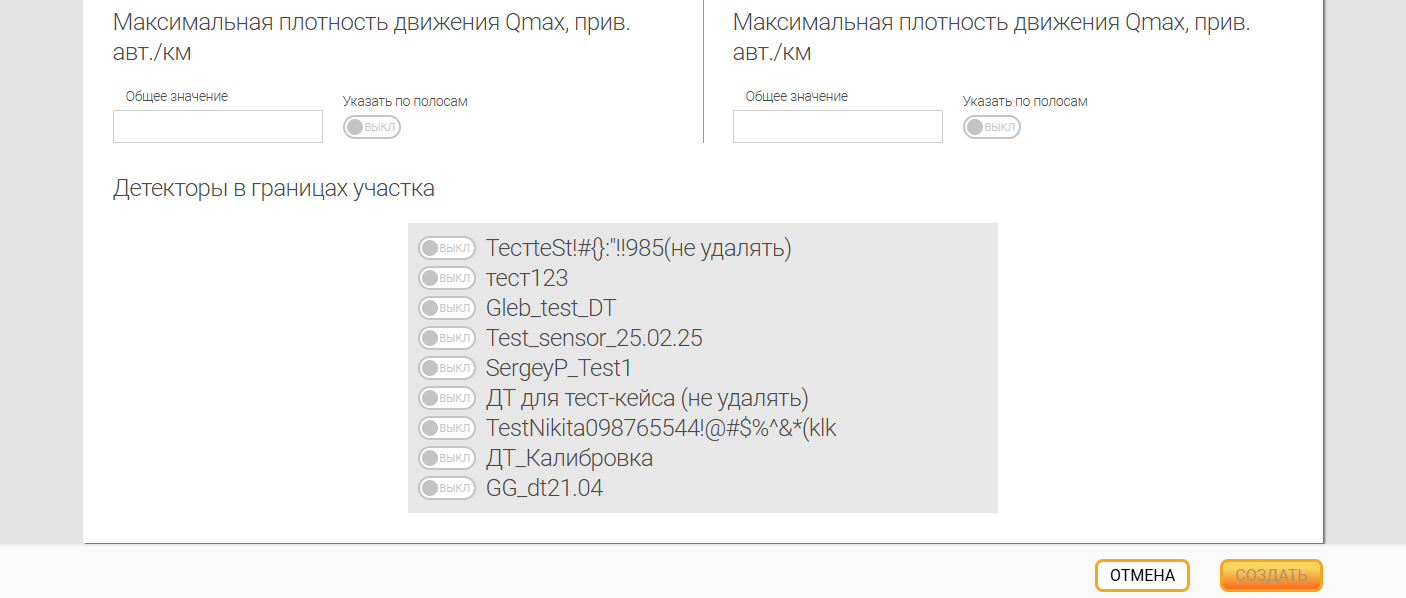
Параметры добавления участка дороги
| Наименование поля | Описание |
|---|---|
| Учетный номер дороги1 | Учетный номер, заданный в пункте меню Классификатор при добавлении автомобильной дороги. Например, М-4. По умолчанию информация в таблице сортируется по возрастанию значения колонки Учетный номер. |
| Начало участка1 | Пикетаж начала участка дороги (км+м) |
| Конец участка1 | Пикетаж конца участка дороги (км+м) |
| Протяженность участка | Значение протяженности дороги, вычисленное следующим образом: в прямом направлении - из конца вычитается начало, в обратном - из начала вычитается конец. Если протяженность дороги получилась отрицательной, пользователь ввел некорректные значения начала и конца участка дороги (пикетаж). |
| Название1 | Название участка дорог в Системе. Задается пользователем. |
| Два направления/одно направления | Переключатель, позволяющий выбрать одно или два направления у участка дороги (к 0 км/от 0 км). По умолчанию участок дороги двунаправленный. |
| От 0 км/к 0 км1 | Название соответствующего направления в Системе. Задается пользователем. |
| Количество полос | Количество полос по направлению |
| Пропускная способность P, приведенных авт./ч | Поле ввода максимальной расчетной пропускной способности участка автомобильной дороги. По умолчанию переключатель Указать по полосам не установлен. Если пользователь его включает, добавляется возможность ввести значения для каждой полосы в отдельности |
| Максимальная плотность движения Qmax, приведенных авт./ч | Поле ввода максимальной расчетной плотности движения участка автомобильной дороги. По умолчанию переключатель Указать по полосам не установлен. Если пользователь его включает, добавляется возможность ввести значения для каждой полосы в отдельности |
| Детекторы в границах участка | Список детекторов, установленных в границах выбранного участка дороги. Представлен в виде списка переключателей. |
- Поле, обязательное для заполнения.↩