Классификатор
Пункт меню Классификатор предназначен для определения в Системе классификации регистрируемых объектов. Пользователю доступны фильтр для поиска информации и список уже добавленных в Систему групп классов.
Классы дорожных объектов
Фильтр позволяет осуществлять поиск групп классов дорожных объектов в списке. Рядом с названием списка Группы классов отображается информация об общем количестве групп классов в Системе.
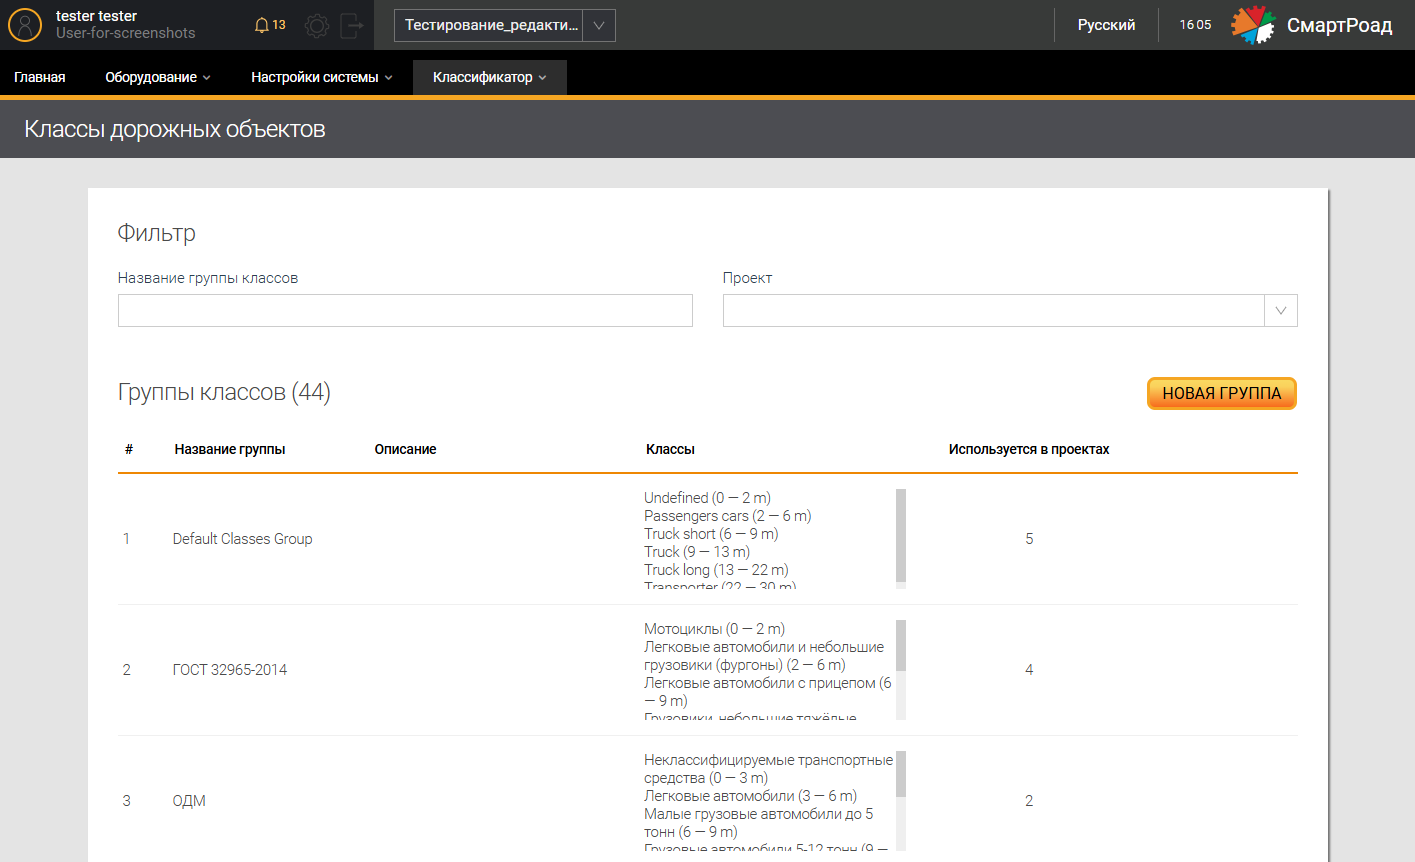
Параметры фильтра Группы классов
| Параметр/кнопка | Описание |
|---|---|
| Название группы классов | В поле вводится название группы классов дорожных объектов |
| Проект | В выпадающем списке пользователю отображается список зарегистрированных в Системе проектов, к которым привязаны группы классов |
Группы классов, созданные в Системе, отображаются в списке Группы классов. В Системе предложена следующая классификация дорожных объектов по умолчанию, заданная в БД:
- Undefined (неопределенные) -
0-2м; - Passengers cars (пассажирские автомобили) -
2-6м; - Truck short (короткие грузовики) -
6-9м; - Truck (грузовики) -
9-13м; - Truck long (длинные грузовики) -
13-22м; - Transporter (транспортировочные автопоезда) -
22-30м.
Значения классов ТС могут быть изменены пользователем с наличием прав на настройку групп классов.
Параметры списка Группы классов
| Параметр | Описание |
|---|---|
| Название группы | Название группы классов, заданное при добавлении |
| Описание | Описание группы классов, заданное при добавлении |
| Классы | Классы объектов, включенные в группу классов |
| Используется в проектах | Количество проектов, в которых используется группа классов |
Добавление новой группы классов
Добавление новой группы классов осуществляется с помощью кнопки Новая группа. Кликом на кнопку пользователю отображается окно ввода параметров для создания новой группы.
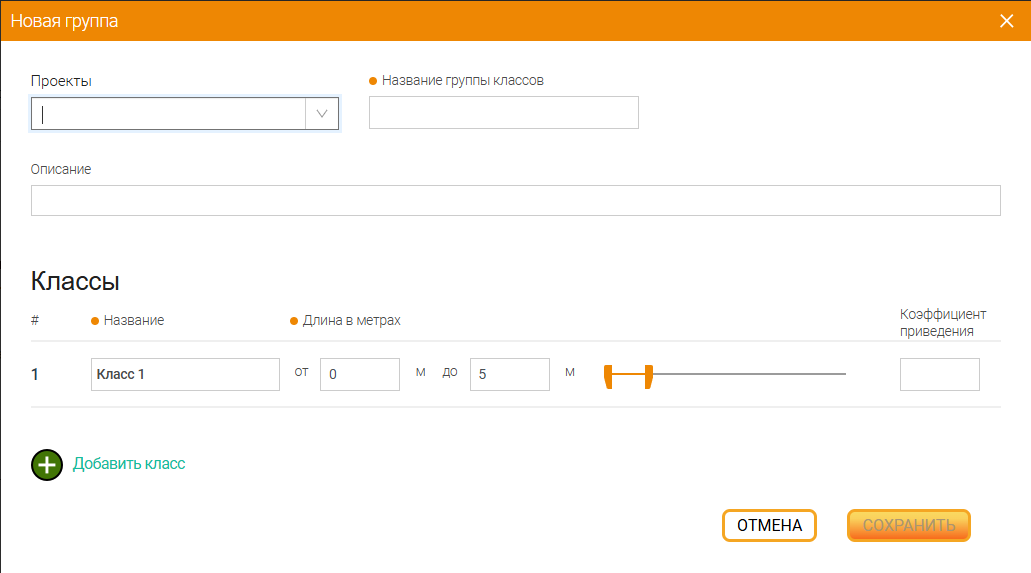
Параметры добавления группы классов
| Параметр | Описание |
|---|---|
| Проекты | В выпадающем списке отображается список доступных проектов, к которому будет привязана группа классов. Выбор осуществляется установкой чек-бокса |
| Название группы классов 1 | В поле вводится название новой группы классов, которое будет отображаться в Системе |
| Описание | В поле вводится описание группы классов |
| Название 1 | Название класса, которое будет отображаться в Системе |
| Длина в метрах 1 | Длина класса в метрах. Указываются значения от и до. Пользователь может установить длину объектов класса с помощью ползунка |
| Коэффициент приведения | Количество легковых автомобилей, которое соответствует ТС по длине. Диапазон значений от 0.1 до 9.9. Должно быть указано для всех классов. Значение по умолчанию - 1. |
| Добавить класс | Кнопка добавления нового класса в группу |
Типы дорог
Подменю Типы дорог в верхнем меню Классификатор предназначено для ведения справочника типов дорог. По клику на него открывается страница Справочник типов дорог со списком уже добавленных в Систему типов дорог. Добавление нового типа дороги осуществляется путём нажатия на кнопку Добавить тип дороги.
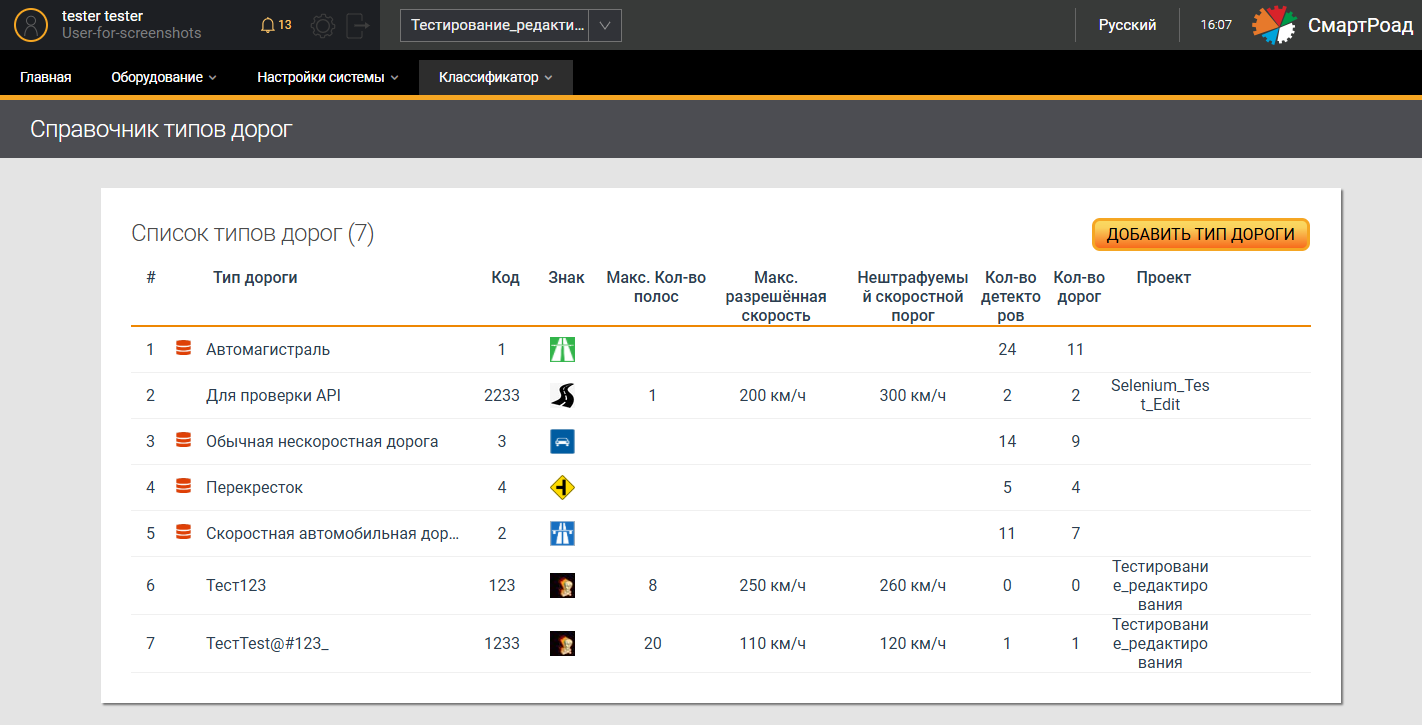
Параметры списка типов дорог
| Параметр | Описание |
|---|---|
| Тип дороги | Название типа дороги, указанное при добавлении дороги в Систему |
| Код | Код типа дороги |
| Знак | Изображение (иконка) для типа дороги |
| Макс. кол-во полос | Максимальное количество полос для типа дороги |
| Макс. разрешённая скорость | Максимальная разрешённая скорость для типа дороги |
| Нештрафуемый скоростной порог | Нештрафуемый скоростной порог для типа дороги |
| Кол-во детекторов | Количество детекторов в Системе, в настройках которых используется данный тип дороги |
| Кол-во дорог | Количество настроенных дорог в Системе, которые используют данный тип дороги |
| Проект | Название проекта, в рамках которого применяется тип дороги |
Добавление типа дороги
При нажатии на кнопку Добавить тип дороги отображается окно для ввода параметров добавления нового типа дороги.
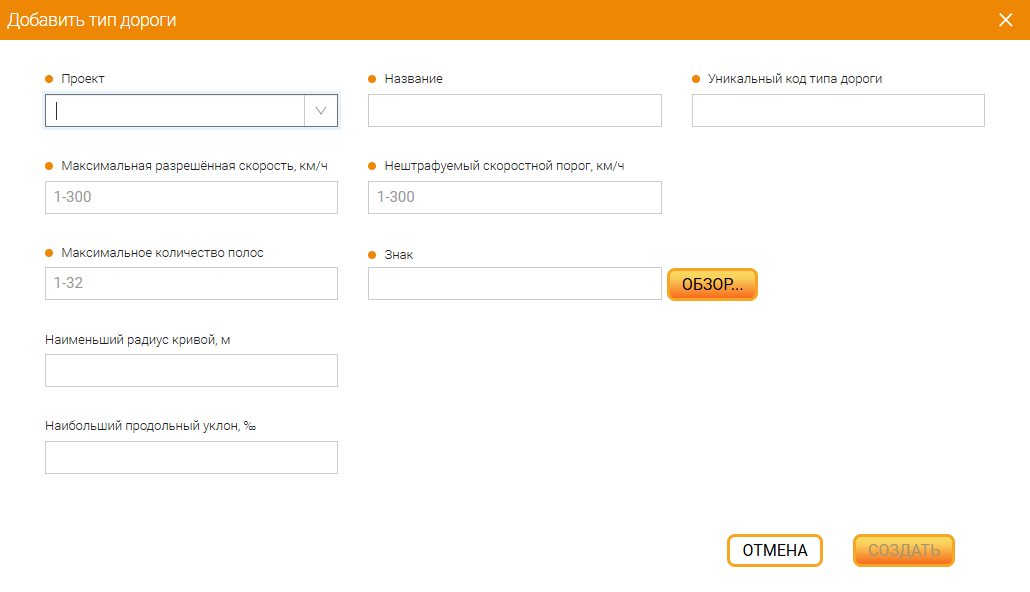
Параметры добавления нового типа дороги
| Параметр | Описание |
|---|---|
| Проект 1 | Выпадающий список для выбора проекта, к которому будет привязан новый тип дороги. При нажатии на поле пользователю отображается список доступных для выбора проектов |
| Название 1 | В поле вводится название создаваемого типа дороги |
| Уникальный код дороги 1 | В поле вводится уникальный код для нового типа дороги |
| Максимальная разрешённая скорость, км/ч 1 | В поле вводится значение максимальной разрешенной скорости на данном типе дороги |
| Нештрафуемый скоростной порог, км/ч 1 | В поле вводится значение нештрафуемого скоростного порога на данном типе дороги |
| Максимальное количество полос 1 | В поле вводится значение максимального количества полос на данном типе дороги (от 1 до 32) |
| Знак 1 | Пиктограмма для типа дороги. При нажатии на поле открывается окно для выбора файла пиктограммы на ПК пользователя. После выбора в поле отображается путь к файлу и название файла. При наведении указателем мыши на поле отображается подсказка с допустимыми параметрами файла: размер не должен превышать: 100 килобайт. Тип файла: gif, png, jpg, jpeg, webp. Ширина и высота не больше: 25px. |
| Обзор | Кнопка, при нажатии на которую открывается окно для выбора файла пиктограммы на ПК пользователя |
| Наименьший радиус кривой в плане, м | В поле вводится значение наименьшего радиуса кривой в плане (в метрах) для данного типа дороги. Данное значение используется в алгоритмах определения событий и инцидентов по косвенным признакам в контрольных зонах, где нет непосредственного покрытия детекторами (между зонами детектирования). Радиус, при котором обеспечивается безопасное движение ТС с расчетной скоростью при чистом увлажненном покрытии, с устройством виражей и уширением проезжей части. |
| Наибольший продольный уклон, ‰ | В поле вводится значение наибольшего продольного уклона (в промилле) на данном типе дороги. Данное значение используется в алгоритмах определения событий и инцидентов по косвенным признакам в контрольных зонах, где нет непосредственного покрытия детекторов (между зонами детектирования) |
| Создать/Сохранить | При нажатии на кнопку создаётся новый тип дороги в Системе |
| Отмена | По нажатию на кнопку окно Добавить тип дороги закрывается, Система возвращает пользователя на страницу Список типов дорог |
Редактирование типа дороги
Для изменения параметров типа дороги необходимо кликнуть на тип дороги в списке, после чего откроется окно редактирования с ранее заданными параметрами.
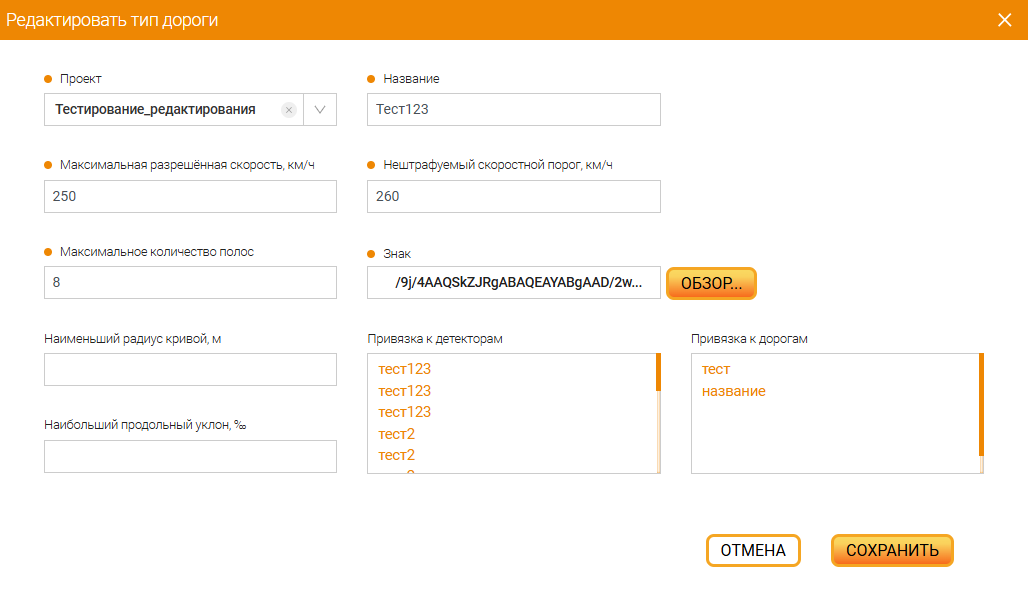
Параметры редактирования типа дороги
| Параметр | Описание |
|---|---|
| Проект 1 | Выпадающий список выбора проекта, к которому будет привязан новый тип дороги. При нажатии на поле пользователю отображается список доступных для выбора проектов |
| Название 1 | В поле вводится название создаваемого типа дороги |
| Максимальная разрешённая скорость, км/ч 1 | В поле вводится значение максимальной разрешенной скорости на данном типе дороги |
| Максимальное количество полос 1 | В поле вводится значение максимального количества полос на данном типе дороги (от 1 до 32) |
| Нештрафуемый скоростной порог, км/ч 1 | В поле вводится значение нештрафуемого скоростного порога на данном типе дороги |
| Знак 1 | Пиктограмма для типа дороги. При нажатии на поле открывается окно для выбора файла пиктограммы на ПК пользователя. После выбора в поле отображается путь к файлу и название файла. При наведении указателем мыши на поле отображается подсказка с допустимыми параметрами файла: размер не должен превышать 100 килобайт. Тип файла: gif, png, jpg, jpeg, webp. Ширина и высота не больше: 25px. |
| Наименьший радиус кривой в плане, м | В поле вводится значение наименьшего радиуса кривой в плане (в метрах) для данного типа дороги. Данное значение используется в алгоритмах определения событий и инцидентов по косвенным признакам в контрольных зонах, где нет непосредственного покрытия детекторами (между зонами детектирования). Радиус, при котором обеспечивается безопасное движение ТС с расчетной скоростью при чистом увлажненном покрытии, с устройством виражей и уширением проезжей части. |
| Наибольший продольный уклон, ‰ | В поле вводится значение наибольшего продольного уклона (в промилле) на данном типе дороги. Данное значение используется в алгоритмах определения событий и инцидентов по косвенным признакам в контрольных зонах, где нет непосредственного покрытия детекторов (между зонами детектирования) |
| Привязка к детекторам | Список детекторов, размещенных на дорогах выбранного типа |
| Привязка к дорогам | Список дорог, на которых установлены выбранные в предыдущем поле детекторы |
Типы полос
Подменю Типы полос в верхнем меню Классификатор предназначено для ведения справочника различных типов полос. При нажатии на данный подраздел открывается страница Справочник типов полос со списком уже добавленных в Систему типов полос. Добавление нового типа полосы осуществляется путем нажатия на кнопку Добавить тип полосы.
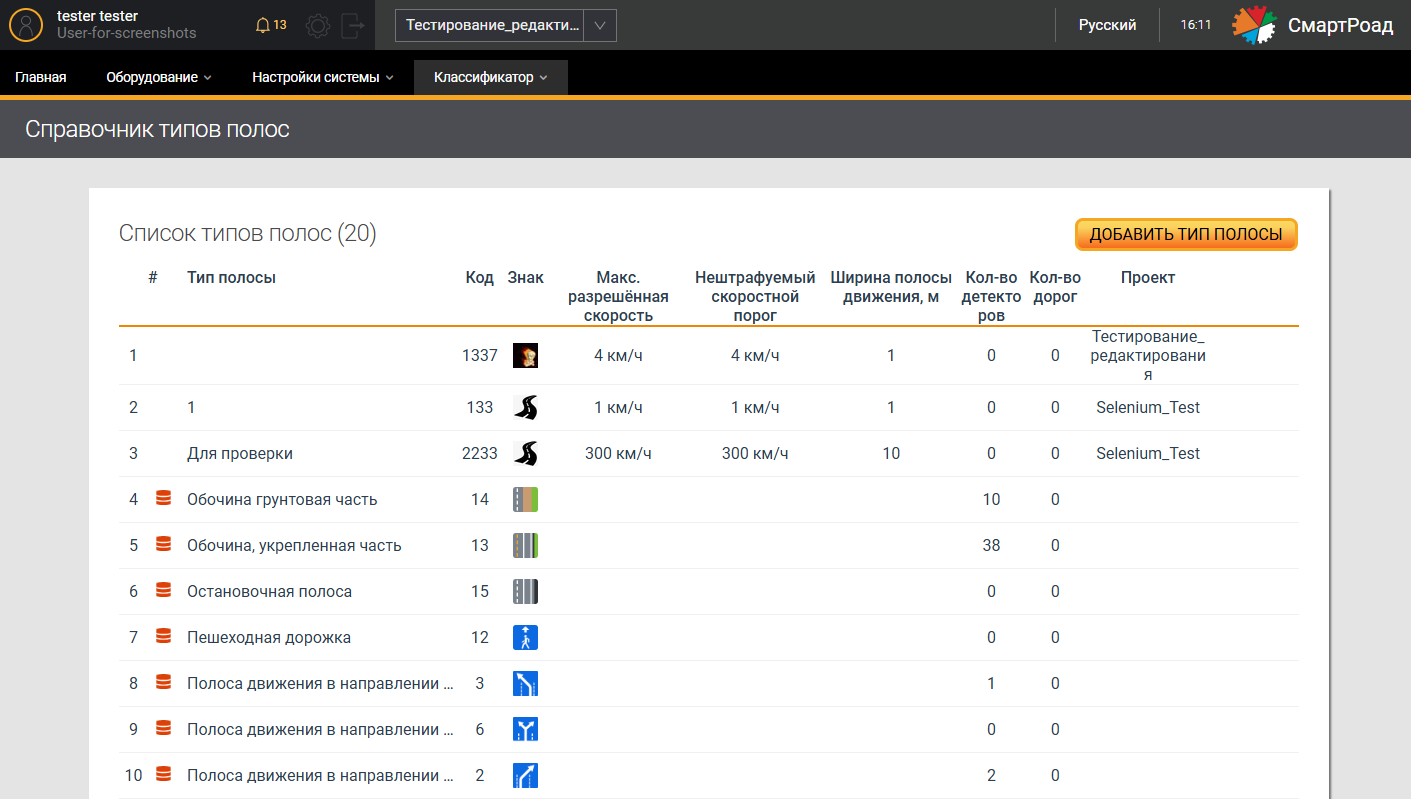
Параметры списка типов полос
| Параметр | Описание |
|---|---|
| Тип полосы | Название типа полосы |
| Код | Код типа полосы |
| Знак | Изображения (иконка) для типа полосы |
| Максимальная разрешённая скорость | Максимальная разрешённая скорость для типа полосы |
| Нештрафуемый скоростной порог | Нештрафуемый скоростной порог для типа полосы |
| Ширина полосы движения, в метрах | Ширина данного типа полосы, указанная в метрах |
| Кол-во детекторов | Количество детекторов Системе, в настройках которых используется данный тип полосы |
| Кол-во дорог | Количество настроенных дорог в Системе, которые используют данный тип полосы |
| Проект | Проект, в рамках которого применяется тип полосы |
Добавить тип полосы
При нажатии на кнопку Добавить тип полосы отображается окно для ввода параметров добавления нового типа полосы.
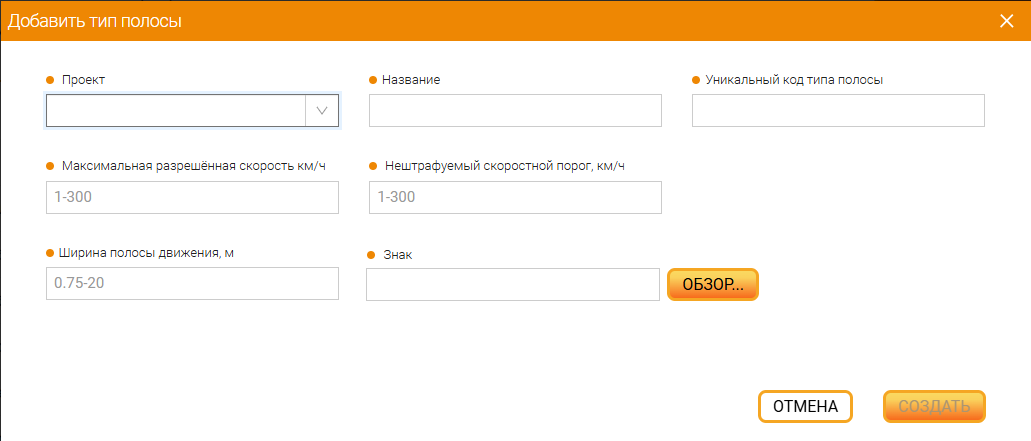
Параметры добавления нового типа полосы
| Параметр | Описание |
|---|---|
| Проект 1 | Выпадающий список для выбора проекта, к которому будет привязан новый тип полосы. Кликом на поле пользователю отображается список доступных для выбора проектов |
| Название 1 | В поле вводится название создаваемого типа полосы |
| Уникальный код полосы 1 | В поле вводится уникальный код для нового типа полосы |
| Максимальная разрешённая скорость, км/ч 1 | В поле вводится значение максимальной разрешенной скорости на данном типе полосы |
| Нештрафуемый скоростной порог, км/ч 1 | В поле вводится значение нештрафуемого скоростного порога на данном типе полосы |
| Ширина полосы движения, м 1 | В поле вводится значение ширины данного типа полосы |
| Знак 1 | Пиктограмма для типа полосы. При нажатии на поле открывается окно для выбора файла пиктограммы на ПК пользователя. После выбора в поле отображается путь к файлу и название файла. При наведении указателем мыши на поле отображается подсказка с допустимыми параметрами файла: размер не должен превышать 100 килобайт. Тип файла: gif, png, jpg, jpeg, webp. Ширина и высота не больше: 25px. |
| Обзор | Кнопка, кликом на которую открывается окно для выбора файла пиктограммы на ПК пользователя |
| Создать | Кликом на кнопку создаётся новый тип полосы в Системе |
| Отмена | Кликом на кнопку окно Добавить тип полосы закрывается, Система возвращает пользователя на страницу Список типов полос |
Дороги
Подменю Дорог в верхнем меню Классификатор предназначено для создания, удаления и добавления дорог в Системе. По клику на него открывается страница Справочник дорог со списком уже добавленных в Систему дорог. Добавление новой дороги осуществляется путем нажатия на кнопку Добавить дорогу.
Рядом с названием списка Перечень автомобильных дорог отображается информация об общем количестве дорог в Системе.
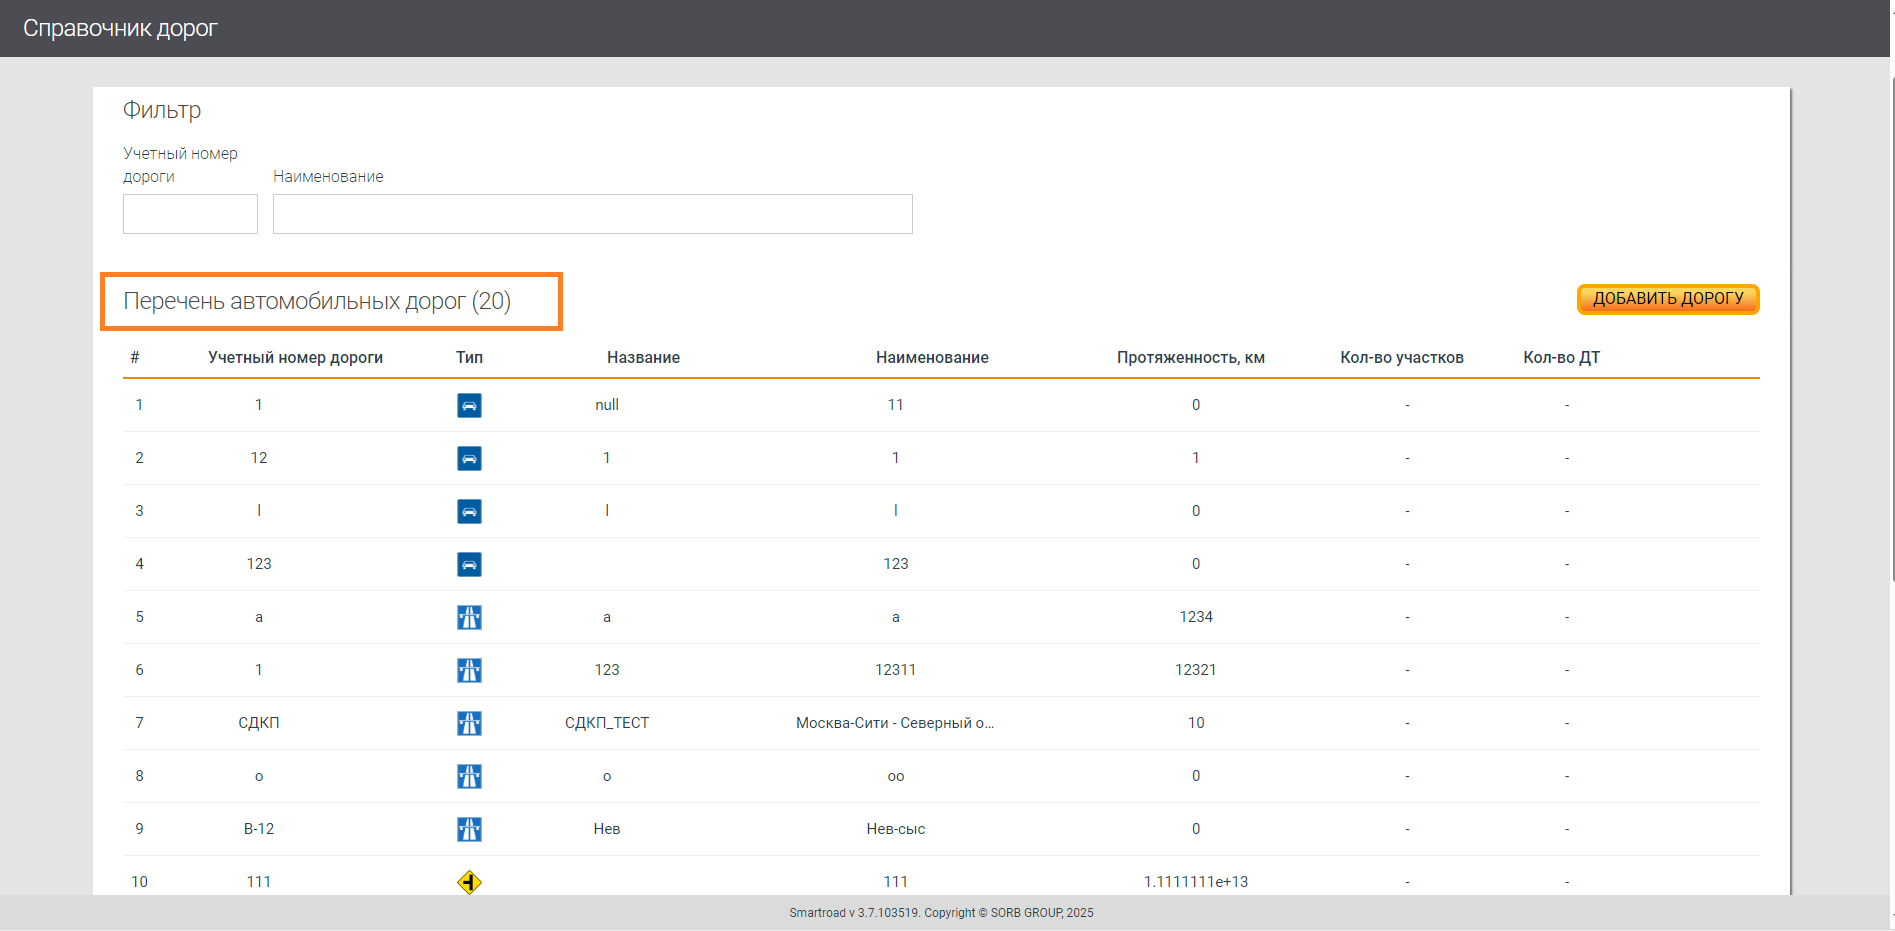
Параметры фильтра на странице Справочник дорог
| Параметр | Описание |
|---|---|
| Учетный номер дороги | Учетный номер, заданный в пункте меню Классификатор, при добавлении автомобильной дороги. По умолчанию информация в таблице сортируется по возрастанию значения колонки Учетный номер дороги. Например, М-4 |
| Наименование | Наименование дороги. Например, "Москва - Тверь - Великий Новгород - Санкт-Петербург" |
Параметры списка Перечень автомобильных дорог
| Параметр | Описание |
|---|---|
| Учетный номер дороги | Учетный номер, заданный в пункте меню Классификатор, при добавлении автомобильной дороги. По умолчанию информация в таблице сортируется по возрастанию значения колонки Учетный номер дороги. Например, М-4 |
| Тип | Знак, соответствующий типу дороги на странице Типы дорог |
| Название | Название дороги. Необязательный параметр. Например, "Нева" |
| Наименование | Наименование дороги. Например, "Москва - Тверь - Великий Новгород - Санкт-Петербург" |
| Протяженность | Значение протяженности дороги, вычисленное следующим образом: в прямом направлении - из конца вычитается начало, в обратном - из начала вычитается конец. Если протяженность дороги получилась отрицательной, пользователь ввел некорректные значения начала и конца участка дороги. |
| Количество участков | Количество участков, на которые поделена данная дорога |
| Количество детекторов | Количество детекторов, установленных на дороге |
Добавление дороги
Добавление новой дороги в Систему осуществляется кликом на кнопку Добавить дорогу на странице Справочник дорог. При нажатии на кнопку пользователю отображается окно ввода параметров новой дороги.
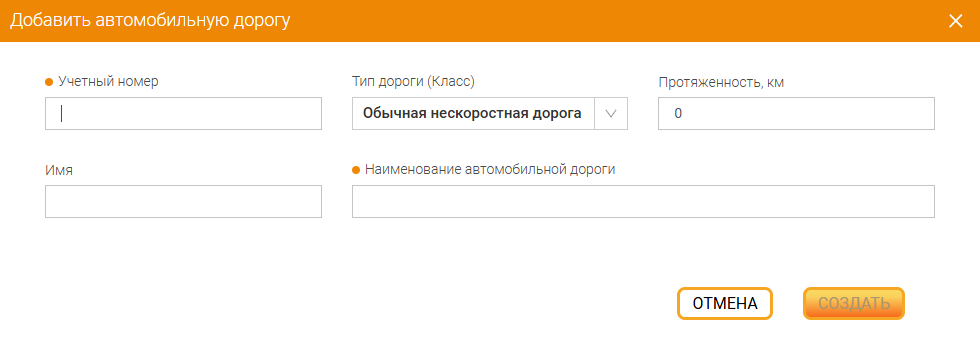
| Параметр | Описание |
|---|---|
| Учетный номер дороги 1 | Учетный номер, заданный в пункте меню Классификатор, при добавлении автомобильной дороги. По умолчанию информация в таблице сортируется по возрастанию значения колонки Учетный номер дороги. Например, М-4 |
| Имя | Название дороги. Необязательный параметр. Например, "Нева" |
| Класс дороги | Класс дороги по условиям движения и доступа к ней. Возможные значения:
|
| Наименование автомобильной дороги | Наименование дороги. Например, "Москва - Тверь - Великий Новгород - Санкт-Петербург" |
| Протяженность дороги | Значение протяженности дороги, вычисленное следующим образом: в прямом направлении - из конца вычитается начало, в обратном - из начала вычитается конец. Если протяженность дороги получилась отрицательной, пользователь ввел некорректные значения начала и конца участка дороги. |
- Поле, обязательное для заполнения↩